Update 2: The routing information is this article is incorrect. While technically accurate, it deviates from modern (mid-2013) Magento community standards, and may lead to incompatibilities. If you want to learn the proper way of setting up a Magento admin controller, checkout Magento Admin Hello World Revisited.
Update: This article covers how to setup a custom frontname for a Magento admin module. Sometime after it was written, Magento team members indicated that the “correct” way to setup an admin URL was to add your module to the admin frontname, as described here. Many of the Magento ajax helpers assume a frontname of admin, and creating your own will limit the functionality you can provide. If you’re interested in learning more about how Magento routes URLs, checkout the dispatch series.
Magento, as we’re fond of pointing out, is more than a shopping cart, and more than a web application. It’s a software system for developing software applications. The Community, Professional, and Enterprise products reflect this, as they each ship with two applications. The first is the Shopping Cart that allows users to purchase products. The second is the Admin Console application, which allows users to manage their stores.
While the Magento Admin Console application uses the same system code that the core Shopping Cart application does, in certain cases it’s using the system differently. This can be disorienting when you make the inevitable shift from customizing the customer facing experience to customizing your store owner/client facing experience. In the next few articles we’ll be moving through the various Admin systems and conventions, starting with the inevitable Hello World.
One last note before we begin. The Admin Console application is often refereed to as the Adminhtml application. That’s because most of its code is found in the Mage_Adminhtml module. We’ll use the terms interchangeably, but both are referring to the same basic application.
Controller Dispatch
Admin code, just like Cart code, lives in a standard Magento module. Create a blank skeleton module named Adminhelloworld. If you’re unsure how to create an empty module, you’ll want to play to catch up.
If you have some boilerplate for config.xml (if you’re using a tool like moduleCreator) you may want to leave it out so it’s clear what each bit you’ll be adding to this module does
<config>
    <modules>
        <Alanstormdotcom_Adminhelloworld>
            <version>0.1.0</version>
        </Alanstormdotcom_Adminhelloworld>
    </modules>
</config>
As always, for the purposes of this article our full package name will be
Alanstormdotcom_Adminhelloworld
The first thing we’ll do is setup an admin <routers/> section.
<config>
    <!-- ... -->
    <admin>
        <routers>
            <the_name_of_this_element_is_not_important_it_should_be_unique>
                <use>admin</use>
                <args>
                    <module>Alanstormdotcom_Adminhelloworld</module>
                    <frontName>adminhelloworld</frontName>
                </args>
            </the_name_of_this_element_is_not_important_it_should_be_unique>
        </routers>
    </admin>
    <!-- ... -->
</config>
This is similar to setting up a <routers/> section for the cart application, with two exceptions. First, <routers/> for the Admin Console need to exist in the <admin/> section of config.xml. Second, the value of the <use/> node should be “admin“. The <module> and <frontName> tag are setup identical to a Cart controller, and contain the packagename/modulename prefix for your class and the frontName for your URL, respectively. The config snippet above would enable URLs in the form
//index controller, index action
http://magento.example.com/adminhelloworld

//foo controller, bar action
http://magento.example.com/adminhelloworld/foo/bar
the_name_of_this_element_is_not_important_it_should_be_unique
You’re probably wondering about the
<the_name_of_this_element_is_not_important_it_should_be_unique />
node. Typically, people name this node the same as their frontName. There’s nothing wrong with this convention, but I’ve found that one of the confusing things to a Magento newcomer is the way some nodes have semantic value, and others do not. For the later, I’ve started giving them nonsense names like the one above to make it clear which nodes are the important ones. This is by no means necessary, but it reduces the cognitive load when facing a new concept, so we’ll stick to it for the rest of the tutorial. It’s also possible this node
With the router setup, let’s create an Index Controller with default Index Action
File: app/code/local/Alanstormdotcom/Adminhelloworld/controllers/IndexController.php

class Alanstormdotcom_Adminhelloworld_IndexController extends Mage_Adminhtml_Controller_Action
{
    public function indexAction()
    {
        $this->loadLayout();
        $this->renderLayout();
    }
}
The only difference from a standard controller here is that we’re extending Mage_Adminhtml_Controller_Action instead of Mage_Core_Controller_Varien_Action. Mage_Adminhtml_Controller_Action contains important code for validating the admin session, as well as several methods that are useful in an Admin Console context.
Testing It Out
Let’s test our controller. First, if you’re logged into the Admin Console, log out now. This isn’t normally necessary, but humor us for the moment.
That bit of hand wavyness out of the way, navigate to the following URL
http://magento.example.com/index.php/adminhelloworld/
Given our instructions, you should be unsurprised to see the admin login screen.

Log in with your admin account, and should you be directed to an empty Admin Console page with a URL that looks something like
http://magento.example.com/index.php/adminhelloworld/index/index/key/101159b8d6856b3f43572df245227369/
Magento has done two things here. First, it’s auto-expanded the Controller Name (index) and Action Name (also index) and inserted them into the URL. Secondly, you’ll see it added a a key/value paramater to the end of the URL. Let’s trying taking it off and directly navigating to
http://magento.example.com/index.php/adminhelloworld/index/index
Instead of navigating to your new page, Magento just kicked you to the Dashboard page … what gives?
Every URL in the Admin Conslle needs that special key at the end. When the login page redirected us to our original destination, it filled this in for us. This is part of Magento’s cross site request forgery protection.
This does present us with a problem though. How can we navigate to Admin pages? The easiest way is to configure a navigation menu item for your new page. Let’s add the following to your config.xml file.
<config>

    <!-- ... -->
    <adminhtml>
        <menu>
            <tutorial_menu translate="title" module="adminhelloworld">
                <title>Tutorial Menu</title>
                <sort_order>9999</sort_order>
                <children>
                    <first_page module="adminhelloworld">
                        <title>Our First Page</title>
                        <action>adminhelloworld/index/index</action>
                    </first_page>
                </children>
            </tutorial_menu>
        </menu>
    </adminhtml>
    <!-- ... -->

</config>
If you refresh any admin page, you’ll be greeted with the following Warning
Warning: include(Mage/Adminhelloworld/Helper/Data.php) [function.include]: failed to
open stream: No such file or directory
See those module= attributes up there? Magento is using those to determine which Module’s Data Helper it should use to translate the Menu items. Let’s add that Helper to our module.
First, enable helpers in the config.xml as you would for any other modules
<global>
    <helpers>
        <adminhelloworld>
            <class>Alanstormdotcom_Adminhelloworld_Helper</class>
        </adminhelloworld>
    </helpers>
</global>
Then add the Data helper
File: app/code/local/Alanstormdotcom/Adminhelloworld/Helper/Data.php
class Alanstormdotcom_Adminhelloworld_Helper_Data extends Mage_Core_Helper_Abstract
{
}
Clear your cache, refresh, and you should now notice a new top level menu for your page called Tutorial Menu with a single sub-menu with the title “Our First Page”. This link will be created with the proper key parameter. Let’s review what each node within <menu/> is doing.
<tutorial_menu/>
This is the top level node of our <menu/> node. Nodes added at this level are used to create the top level menu items in the Admin Console. Magento CE ships with the top level nodes of Dashboard, Sales, Catalog, Customers, Promotions, Newsletter, CMS, Reports, and System. The display name of the node will be set later (see below), and the node name itself will be used at various points by other system code, so you’ll want to give if a logical name.
<title/>
The title nodes are used to set the display name of a particular menu item. This display name is the token that will passed to a module’s data helper translation method.
<sort_order/>
Each menu item has a sort order. For top level menu items, lower numbers will sort further to the left, higher numbers to the right. For sub-menu items the sort is top/down.
<children/>
Within the top level node, the <children/> node will contain definitions for the individual sub-menu items. These items will be the actual links to pages in the Admin Console.
<first_page/>
Our sub-menu, or first child level node. Again, just like the parent node, the display name is set with another <title/> node, and you may also include a <sort_order/> node.
<action/>
The action node is the internal magento URL/route we want our page to link to.
Adding to Default Menus
Also, keep in mind that you can inject a new menu item into menus created by other Magento modules. For example, the following will add an additional link to the end of the system menu.
<config>

    <!-- ... -->
    <adminhtml>
        <menu>
            <tutorial_menu translate="title" module="adminhelloworld">
                <title>Tutorial Menu</title>
                <sort_order>9999</sort_order>
                <children>
                    <first_page module="adminhelloworld">
                        <title>Our First Page</title>
                        <action>adminhelloworld/index/index</action>
                    </first_page>
                </children>
            </tutorial_menu>

            <system>
                <children>
                    <another_menu_from_us>
                        <title>Here Too!</title>
                        <action>adminhelloworld/index/index</action>
                    </another_menu_from_us>
                </children>
            </system>
        </menu>
    </adminhtml>
    <!-- ... -->

</config>
Finally, newer versions of Magento support a special config file named
etc/adminhtml.xml
that can be used to include menus separate from the main config.xml files.
We’ll look at using the Admin controller’s helper methods to create working links to Admin Console pages in a section below, but for now the Menu items should ensure we can get back here whenever we want.
Layout
If this were the Cart application, we’d start wading through the layout XML files and adding handles to create Blocks. While the Admin Console application has XML layout files, there’s a second option more friendly to programmers.
If you examine the Adminhtml module, you’ll notice that controller actions are used to programmatically create blocks. Try the following in your Index Controller
    public function indexAction()
    {
        $this->loadLayout();

        //create a text block with the name of "example-block"
         $block = $this->getLayout()
         ->createBlock('core/text', 'example-block')
         ->setText('<h1>This is a text block</h1>');

        $this->_addContent($block);

        $this->renderLayout();
    }
Refresh your browser, and you should see the text rendered in the Admin Console

If we take a look at the inherited _addContent method, we can see how this works.
/**
 * @return Mage_Adminhtml_Controller_Action
 */
protected function _addContent(Mage_Core_Block_Abstract $block)
{
    $this->getLayout()->getBlock('content')->append($block);
    return $this;
}
First, Magento gets a reference to the content block for that current layout. That’s why our block adding code must come after our call to the loadLayout method. Next, and last, Magento appends the passed in block to the aforementioned content block.
If you’re ever wrestled with a gnarly Layout XML setup, you can see the advantages to this approach. The tradeoff is, to make any changes to your layout, you’ll need to edit PHP files and risk breaking something unrelated. This technique can be used anywhere in Magento, including controllers in the Cart Application. The core Cart application leans heavily on the Layout XML system to give designers access to the entire Layout system without having to look at any PHP. Like anything in software development there are tradeoffs in either approach one no one “right” way to do it.
Controller Helper Methods and Customizing the Chrome
The Admin controller has a number of useful helper method for customizing the appearance of the Admin Console. The following code example all assume you’re calling from the context of your indexAction method from above.
protected function _setActiveMenu($menuPath)

If you take a look at your top level menu items on your custom controller page, you’ll notice none of them are selected. The system for rendering the navigation is loosely coupled with the controller/action hierarchy. You need to tell Magento which menu you want highlighted in the controller action by calling the _setActiveMenu method.
$this->_setActiveMenu('tutorial_menu/first_page');
$this->_setActiveMenu('system/another_menu_from_us');
You pass this method the path as defined by the menu XML you created in the above sections.
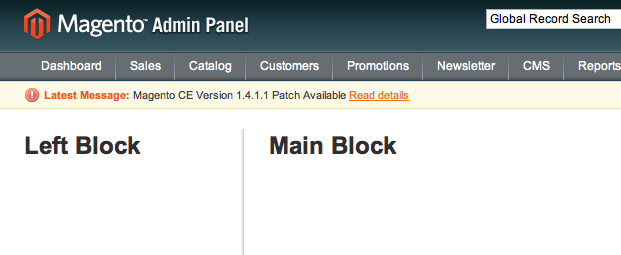
protected function _addLeft(Mage_Core_Block_Abstract $block)
Dy default, a page in the Magento Admin Console is a single wide column. You may create a two column layout by passing in a Block to the _addLeft method.
         $this->_addLeft($this->getLayout()
         ->createBlock('core/text')
         ->setText('<h1>Left Block</h1>'));

         $block = $this->getLayout()
         ->createBlock('core/text')
         ->setText('<h1>Main Block</h1>');
        $this->_addContent($block);
Placing the above code in your controller will give you an Admin Console something like the below image
We’re using simple text Blocks here, but there’s no reason you couldn’t instantiate stand alone blocks and pass them in as well.
protected function _addJs(Mage_Core_Block_Abstract $block)
The _addJs method could just as easily have been named the “add a block of text to the bottom of the page” method. Much like the _addLeft method, you instantiate a Block object to pass in and Magento will render it at the bottom. For example, the following snippet adds a javascript block that will popup an alert every time the page is loaded.
        $block = $this->getLayout()->createBlock('core/text')->setText('<script type="text/javascript">alert ("foo");</script>');
        $this->_addJs($block);
While you could use this the add anything to the bottom of a Magento page, you’ll want to stick to using it as intended. That is, only use it to add Javascript blocks to the bottom of the page. The Magento team itself uses this method heavily in certain sections of the admin to add the Javascript needed for the UI, and it’s possible that future releases may add the blocks to a different part of the page, or possibly even run the blocks through a javascript optimization routine.
public function getUrl($route=”, $params=array())
Finally, the
$this->getUrl('/adminhelloworld/index/index');
You may also pass in an array of key/value pairs to use as additional URL paramaters. For example, the following
$this->getUrl('adminhelloworld/index/index', array('id'=>27)).
would result in a URL something like
http://magento.example.com/index.php/adminhelloworld/index/index/id/27/key/29d7f32e0c46346429d1681ec2cc3c44/
Wrapup
You’re now armed and dangerous. Being able to create unique entry points to the Magento Admin Console is the first step to unlocking the full power of Magento of an application platform, and not just as another shopping cart.