- Introduction to Magento 2 — No More MVC
- Magento 2: Serving Frontend Files
- Magento 2: Adding Frontend Files to your Module
- Magento 2: Code Generation with Pestle
- Magento 2: Adding Frontend Assets via Layout XML
- Magento 2 and RequireJS
- Magento 2 and the Less CSS Preprocessor
- Magento 2: CRUD Models for Database Access
- Magento 2: Understanding Object Repositories
- Magento 2: Understanding Access Control List Rules
- Magento 2: Admin Menu Items
- Magento 2: Advanced Routing
- Magento 2: Admin MVC/MVVM Endpoints
Now that we know how to create Access Control List Rules, and how to generate Admin Menu Items with Magento 2’s CSFR protection, we’re ready to create an MVC/MVVM URL endpoint (i.e. an HTML page) in Magento 2’s admin.
While you’ll find useful information here without it, we’re assuming a basic familiarity with creating routes on Magento’s front end. If there’s a concept below that confuses you, work through the first article in this series before linking to your question on the Magento Stack Exchange in the comments.
Recreate Previous Progress with Pestle
Before we start, we’ll need a module with a few predefined ACL rules, and an admin Menu Item. We’re going to use pestle to quickly get a module up and running. See the previous articles in this series if you’re not sure what the following commands do.
After running the following five commands
$ pestle.phar generate_module Pulsestorm HelloAdminBackend 0.0.1

$ pestle.phar generate_acl Pulsestorm_HelloAdminBackend Pulsestorm_HelloAdminBackend::top,Pulsestorm_HelloAdminBackend::menu_1

$ pestle.phar generate_menu Pulsestorm_HelloAdminBackend Magento_Backend::system_other_settings Pulsestorm_HelloAdminBackend::a_menu_item Pulsestorm_HelloAdminBackend::menu_1 "Hello Admin Backend Pestle" pulsestorm_hello_admin_backend/index/index 1

$ php bin/magento module:enable Pulsestorm_HelloAdminBackend

$ php bin/magento setup:upgrade
you’ll have a Pulsestorm_HelloAdminBackend module with an ACL hierarchy defined, and a single Menu Item under System -> Other Settings -> Hello Admin Backend Pestle. With that, we’re ready to get started.
Magento 2 Admin URL Structure
If you look at the URL of your generated Menu Item hyperlink (Right click, Copy Link As)
http://magento.example.com/admin/pulsestorm_hello_admin_backend/index/index/key/...
you’ll see Magento 2’s backend URLs have a four segment URL structure. All Magento 2 admin urls start with the segment /admin/. This sets the area code for the backend. The next three segments
pulsestorm_hello_admin_backend/index/index
are your module front name (pulsestorm_hello_admin_backend), the controller name (index) and the action name (index). For now, just make a note of these, as we’ll be referencing them below.
Create Files
We’re going to start by using pestle to create a routes.xml file and controller file for our URL. Run the following command
$ pestle.phar generate_route
Which Module? (Pulsestorm_HelloWorld)] Pulsestorm_HelloAdminBackend
Which Area (frontend, adminhtml)? (frontend)] adminhtml
Frontname/Route ID? (pulsestorm_helloworld)] pulsestorm_hello_admin_backend
and pestle will add two files to your system
app/code/Pulsestorm/HelloAdminBackend/etc/adminhtml/routes.xml
app/code/Pulsestorm/HelloAdminBackend/Controller/Adminhtml/Index/Index.php
Clear your cache and generated class files, and then click on the Hello Admin Backend Pestle menu. If you’re logged in as the Magento super user, you should be brought to a new, blank admin page!

We’ll get to why this doesn’t work with a non super-user in a moment.
The generate_route command accepts three arguments. The first (Pulsestorm_HelloAdminBackend) is the name of the module you want to add your routes.xml to. The second, (adminhtml) is the Magento area to use for your route. The area normally defaults to frontend, but here we’ve told Magento we want to create a route and controller file for the adminhtml area. The final argument, (pulsestorm_hello_admin_backend), is the frontname to use for our URLs. This serves the same purpose as a front end front name, but with a few key differences we’ll get to in a moment.
First though, let’s take a look at the generated routes.xml file.
Magento 2 adminhtml Routes
The first thing to make a note of is the final path of routes.xml
#File: app/code/Pulsestorm/HelloAdminBackend/etc/adminhtml/routes.xml
You’ll notice Magento wants this file in the adminhtml sub-folder of etc. That’s because we’re setting up a route for the backend admin area. If we open this file
<!-- File: app/code/Pulsestorm/HelloAdminBackend/etc/adminhtml/routes.xml -->
<?xml version="1.0"?>
<config xmlns:xsi="http://www.w3.org/2001/XMLSchema-instance" xsi:noNamespaceSchemaLocation="urn:magento:framework:App/etc/routes.xsd">
    <router id="admin">
        <route id="pulsestorm_hello_admin_backend" frontName="pulsestorm_hello_admin_backend">
            <module name="Pulsestorm_HelloAdminBackend"/>
        </route>
    </router>
</config>
we’ll see a familiar structure. A routes.xml file is a collection of <router/> nodes. Under the <router/> nodes you’ll find individual <route/> nodes. Each of these <route/> nodes tells Magento that a particular URL front name is claimed by a particular module. Above, we’ve told Magento the module Pulsestorm_HelloAdminBackend claims the front name pulsestorm_hello_admin_backend.
Compared to the front end, there are two major differences to be aware of in Magento backend routing. First, the top level <router/> node does not use the standard id.
<router id="admin">
Instead, all Magento 2 admin backend <router/> tags use an id of admin.
The second thing to be aware of is, as previously mentioned, a backend admin URL’s front name (pulsestorm_hello_admin_backend) is actually the second segment of a URL.
http://magento.example.com/admin/pulsestorm_hello_admin_backend/index/index/key/...
All Magento’s backend URLs have /admin as the first segment of a URL. The front name is the second segment. This has some implications for legacy backend routes and Magento’s internal URL identifiers, which we’ll cover in a later article. For now though, let’s take a look at the generated controller file.
Magento 2 Backend Controllers
The first thing you’ll notice about Magento 2 admin controllers is their file names
app/code/Pulsestorm/HelloAdminBackend/Controller/Adminhtml/Index/Index.php
Like all Magento 2 PHP class files, a controller file’s path and name are based on the full class name of the controller class. Magento front end controller’s use a [Package]\[Module]\Controller\[Controller Segment]\[Action Segment] naming convention. Magento 2 backend controller files use a similar naming convention — the only difference is an additional Adminhtml segment.
[Package]\[Module]\Controller\Adminhtml\[Controller Segment]\[Action Segment]
In our case, our controller class name is Pulsestorm\HelloAdminBackend\Controller\Adminhtml\Index\Index. When you create a route with pestle, pestle automatically assumes you want an [frontname]/index/index URL, and creates the controller class name with a corresponding Index\Index.
If you wanted a different URL (say pulsestorm_hello_admin_backend\foo\baz), then you’d manually create a Pulsestorm\HelloAdminBackend\Controller\Adminhtml\Foo\Bar class.
There’s more differences inside a backend controller’s class definition. Let’s take a look
#File: app/code/Pulsestorm/HelloAdminBackend/Controller/Adminhtml/Index/Index.php
<?php
namespace Pulsestorm\HelloAdminBackend\Controller\Adminhtml\Index;
class Index extends \Magento\Backend\App\Action
{
    protected $resultPageFactory;
    public function __construct(
        \Magento\Backend\App\Action\Context $context,
        \Magento\Framework\View\Result\PageFactory $resultPageFactory)
    {
        $this->resultPageFactory = $resultPageFactory;
        return parent::__construct($context);
    }

    public function execute()
    {
        return $this->resultPageFactory->create();
    }
    protected function _isAllowed()
    {
        return $this->_authorization->isAllowed('ACL RULE HERE');
    }

}
There’s a few things to make note of here. First, all Magento backend controllers need to inherit from the Magento\Backend\App\Action class. Not doing so may introduce instability into the system, and open up unintended privacy and security leaks.
The next thing to make note of is the __construct method. While you don’t need a __construct method in your controller, if you do use one you’ll need to include a backend context object
\Magento\Backend\App\Action\Context $context
and make sure you pass that object as the first argument when calling the parent constructor.
return parent::__construct($context);
Context objects are beyond the scope of this article, but in short they’re a cheat the Magento core team uses to inject multiple objects via automatic constructor dependency injection without having multiple constructor arguments. If you didn’t understand that, don’t worry. Just make sure if you use a __construct method, that you follow the above advice.
The last thing to make note of w/r/t to Magento backend admin controllers is the _isAllowed method.
#File: app/code/Pulsestorm/HelloAdminBackend/Controller/Adminhtml/Index/Index.php

protected function _isAllowed()
{
    return $this->_authorization->isAllowed('ACL RULE HERE');
}
The _isAllowed method is required, and is where you, as the module developer, define which ACL rule a user needs to access this URL endpoint. If _isAllowed returns true, then the user is allowed. If not, they’ll get an access denied screen. By convention, this method uses the object in the _authorization property to check a specific ACL rule. The sole exception to this is any account with super user rights. For super users, the results of _isAllowed are ignored.
The pestle generate_route command does not insert a rule for you automatically — that’s why you see the text ACL RULE HERE above. This is why our route only worked for Magento admin super users. If you edit this file to include the ACL rule we generated with generate_acl
protected function _isAllowed()
{
    return $this->_authorization->isAllowed('Pulsestorm_HelloAdminBackend::menu_1');
}
then any user that’s assigned the Pulsestorm_HelloAdminBackend::menu_1 permission (via System -> Permissions) will be able to access this controller endpoint. By convention, this rule should be the same as the rule for accessing the Menu Item, but it’s up to each individual module developer to decide if they want to enforce this convention.
Create View Files
Now that we’ve created an admin endpoint, you’re probably wondering how to add content to it. Like the front end, Magento’s backend is controlled by Magento’s domain specific language for layouts. Below we’re going to use pestle to add a layout handle XML file, as well as a block and template.
$ pestle.phar generate_view
Which Module? (Pulsestorm_HelloGenerate)] Pulsestorm_HelloAdminBackend
Which Area? (frontend)] adminhtml
Which Handle? (pulsestorm_helloadminbackend_index_index)] pulsestorm_hello_admin_backend_index_index
Block Name? (Main)] Main
Template File? (content.phtml)] content.phtml
Layout (ignored for adminhtml) ? (1column)]
After running pestle with the above arguments and clearing your cache, reload your page and you should see pestle’s default block content.

The main pestle difference, (compared to the front end), is the Which Area? argument — you’ll need to specify adminhtml.
This command creates three files — a layout handle XML file, a block view file, and a phtml template for the block. First, let’s take a look at the layout handle XML file.
<!-- File: app/code/Pulsestorm/HelloAdminBackend/view/adminhtml/layout/pulsestorm_hello_admin_backend_index_index.xml -->
<?xml version="1.0"?>
<page xmlns:xsi="http://www.w3.org/2001/XMLSchema-instance" xsi:noNamespaceSchemaLocation="urn:magento:framework:View/Layout/etc/page_configuration.xsd">
    <referenceBlock name="content">
        <block  template="content.phtml"
                class="Pulsestorm\HelloAdminBackend\Block\Adminhtml\Main"
                name="pulsestorm_helloadminbackend_block_main" />
    </referenceBlock>
</page>
You’ll see the format is nearly the same as a layout handle XML file for the front end. The main difference is pestle creates this file in the view/adminhtml folder instead of view/frontend folder. The view/adminhtml folder is where Magento looks for layout handle XML files for backend admin console requests. Keen observers will also notice pestle does not add a layout="..." attribute to the top level page tag. While the backend does support this attribute for setting different page level layouts, most Magento backend layout handle files omit it.
This layout handle XML file adds a block whose class is Pulsestorm\HelloAdminBackend\Block\Adminhtml\Main, and whose template is content.html. If we look at the class generated for that block
#File: app/code/Pulsestorm/HelloAdminBackend/Block/Adminhtml/Main.php
<?php
namespace Pulsestorm\HelloAdminBackend\Block\Adminhtml;
class Main extends \Magento\Backend\Block\Template
{
    function _prepareLayout(){}
}
we’ll see two main differences from a front end block. First, by convention, and admin block’s class name includes Adminhtml. While this isn’t strictly necessary, most of Magento uses this convention, and it never hurts to follow along with what the platform owner is doing. Second, and more importantly, admin blocks need to inherit from the base Magento\Backend\Block\Template class. This class gives admin block objects a different set of injected dependencies (a form key helper, an authorization helper, etc), and a different set of helper methods. While covering these differences is beyond the scope of this article, if you’re curious, take a look at the backend block’s class definition file.
#File: vendor/magento/module-backend/Block/Template.php
Finally, if we take a look at the generated phtml template file.
#File: app/code/Pulsestorm/HelloAdminBackend/view/adminhtml/templates/content.phtml
<h1>This is my template, there are many like it, but this one is mine.</h1>
We see a standard Magento 2 phtml template file. The only difference from a front end template is, again, that we create this file in the adminhtml folder.
At this point, all standard Magento 2 block and template programming techniques apply, and you can build out your admin console page however you want.
Setting the Current Menu and Page Title
There’s two last things we need to cover before moving on. You may have noticed that while navigating the admin, Magento will highlight the left side Menu Item of the page you’re currently on (Dashboard below)

This isn’t the case for our Menu Item. The System menu does not have a highlight. You also may have noticed that our page has a generic Magento Admin title.
There’s two additional steps you’ll need to take in your controller action to match the behavior of the core system. For the menu highlight, you’ll need to use the setActiveMenu method of the page object
#File: app/code/Pulsestorm/HelloAdminBackend/Controller/Adminhtml/Index/Index.php

public function __construct(
    \Magento\Backend\App\Action\Context $context,
    \Magento\Framework\View\Result\PageFactory $resultPageFactory)
{
    $this->resultPageFactory = $resultPageFactory;
    return parent::__construct($context);
}
//...
public function execute()
{
    $page = $this->resultPageFactory->create();
    $page->setActiveMenu('Pulsestorm_HelloAdminBackend::a_menu_item');
    return $page;
}
The setActiveMenu method accepts a single string parameter — the name of the Menu Item you want to set as active. When you add this code, Magento (at the time of this writing) will do two things. The Menu Item’s top level parent (System) will be highlighted and the page’s default title will be set to second level Menu Item’s title (Other Settings).

If you’d like to set a different title, you can do so my directly manipulating the page object’s configuration.
#File: app/code/Pulsestorm/HelloAdminBackend/Controller/Adminhtml/Index/Index.php
public function execute()
{
$page = $this->resultPageFactory->create();
$page->setActiveMenu('Pulsestorm_HelloAdminBackend::a_menu_item');
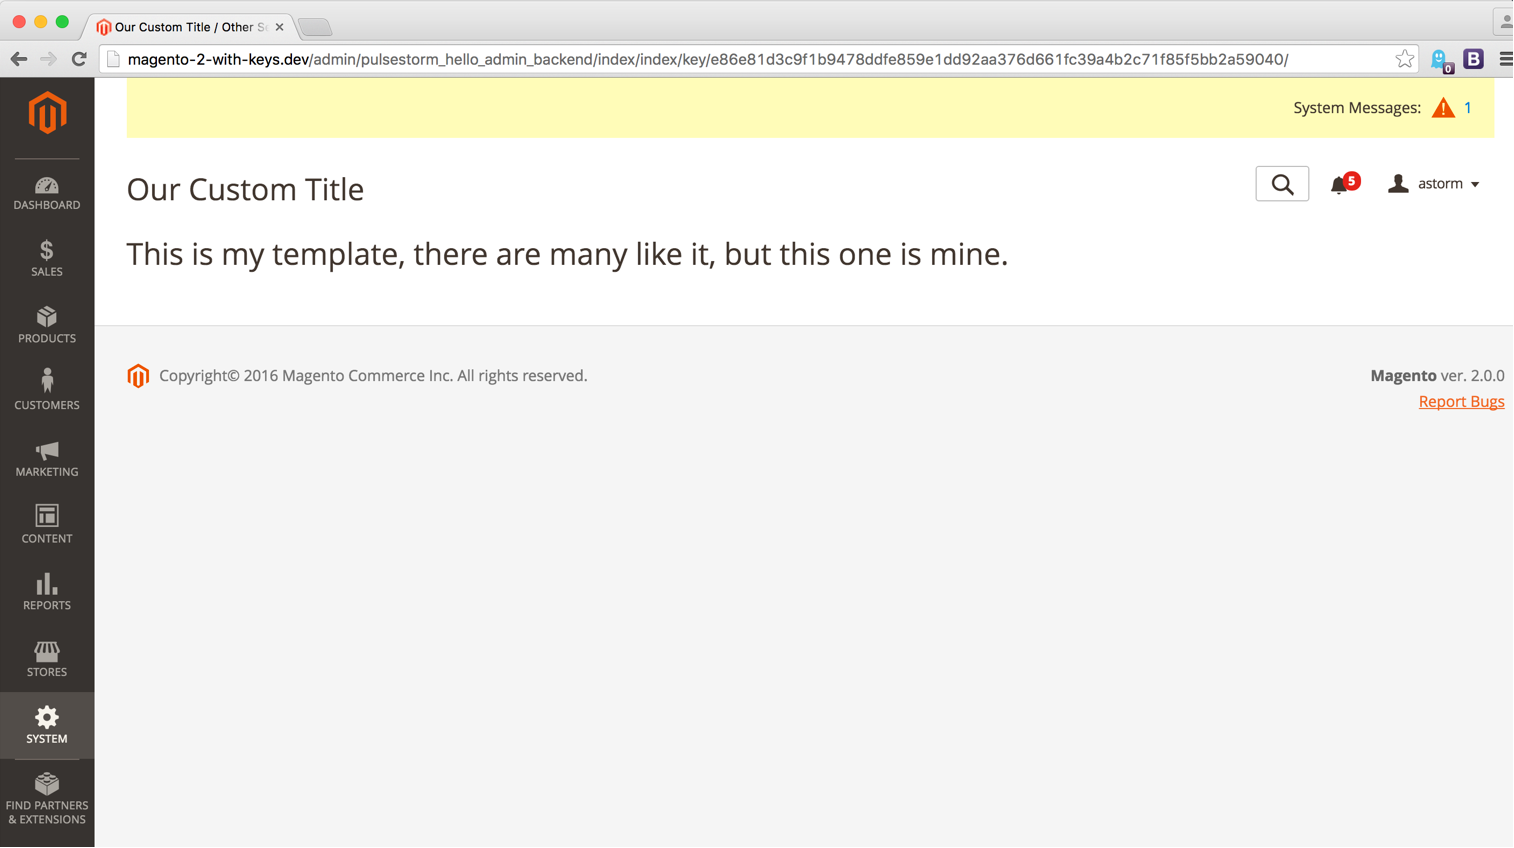
$page->getConfig()->getTitle()->prepend(__('Our Custom Title'));
return $page;
}
You’ll notice we’ve wrapped our string in the global “translate this symbol” function (__). This ensures our title is available to be translated into other languages. With the above in place, you’ll see your page title reflected in the browser.
If you’re thinking the syntax and behavior of these features is a little odd, I’m right there with you. The following
- The
setActiveMenumethod is only available if we inject an object (vs. being something available directly on the backend controller - That
setActiveMenusets a page title, but not the actual page title of a third level menu - That the
prependmethod seems to set a title, but the availablesetmethod does not
all point to the backend controller features being unfinished. You’ll also see core controller actions that look more like this
#File: vendor/magento/module-user/Controller/Adminhtml/Locks/Index.php
public function execute()
{
    $this->_view->loadLayout();
    $this->_setActiveMenu('Magento_User::system_acl_locks');
    $this->_view->getPage()->getConfig()->getTitle()->prepend(__('Locked Users'));
    $this->_view->renderLayout();
}
This pattern (loadLayout, renderLayout) may look familiar to Magento 1 developers. Although this technique is present in the core, the _ leading variables are a hint (although not a guarantee) that the developers don’t intend to keep this technique around. Completing/finalizing these features and deciding on one path forward was likely dropped in favor of more visible functionality for the initial release of Magento 2.0. Such is the life of a software developer under the regime of architects and investors.
Wrap Up
With the above techniques you should be able to start building out your admin features. If you’re still having trouble, this Magento Quickies tutorial has some controller action debugging tips that apply to the front and backends.
All that said, we’ve only touched the surface of what’s happening in Magento’s backend. Next time, we’ll cover some advanced backend routing and layout topics, and prepare ourselves for a deeper dive into Magento’s backend UI functionality.